Sunday, October 19, 2008

Improvements

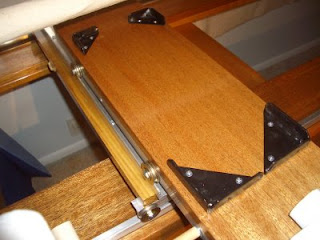
After playing" with the new quilt frame for a couple of weeks, Scott and I worked on some new changes/improvements. Although the original plans suggested using braces to hold the sewing machine in place, I was reluctant to use them because I didn't want them to scratch my sewing machine. However, as I was sewing at a pretty good speed, I found that the sewing machine was bouncing right off the carriage.

So Scott found these corner "thingees" and also found a liquid rubber coating. After dunking each piece and letting it dry for a few days, he installed them on the top carriage.


Same story with the handles which are made out of pvc pipe. I thought they were going to be too big. They aren't and they work great.


Using a couple pieces of doweling, Scott also fashioned a holder for the laser stylus for use while stitching pantographs. The first one we tried did not stay in place, especially when the machine was bouncing all over. This one is attached with a wood screw through a hole drilled through the aluminum tracking on the upper carriage. It's terrific.


I think my husband is breathing a sigh of relief. It's finally finished.


Monday, October 6, 2008

I'm Quilting!

My Aunt Karen asked me to take a video of the frame and how it works.  My problem was that I was using my camera in the left hand and operating the sewing machine in the right.  Then I completely forgot there was audio, too.  So much for patting my head and rubbing my tummy at the same time!  So take that into consideration with the following:


Since I filmed this little video, my husband installed handles on the back of the carriage which has made a big difference.  I'm also playing around with a laser stylus for the pantographs, but have not found a good solution for this yet.  This past week, I have been practicing, practicing, practicing!  I seem to be able to do the meandering thing okay, but pantographs are going to need a LOT more work!


Sunday, October 5, 2008

Quilt Frame 2

After reviewing the plans, we made several modifications.  Because of space constraints, we opted for an 8-foot table instead of 10- or 12-foot.  Scott also built the table out of mahogany which turned out beautifully.  


The other alteration I wanted was that the end supports be detachable so that the frame could be more easily dismantled for storage.  Instead of being permanently attached with wood screws, we changed it to carriage bolts and wing nuts.


The end result was better than I had ever hoped!  Now if I can learn to use it!


Quilt Frame

Ok, I had a great time learning to make the smaller lap quilts, but I want to make the bed-size quilts.  Hand stitching that size Hawaiian quilt can take up to two years, working on it full-time.  I don’t have that kind of patience or attention span.  The next step is to learn to machine quilt.

Devan’s Scrappy Diamonds quilt has created another problem.  My sewing table is only 2 feet by 4 feet.  The thought of wrestling with 3 layers on quilt on that small space was more than I could face.  So…to the internet. 

Cheapskate that I am, I looked for a portable machine quilt frame that was fairly economical.  Ones that I like were the Handiquilter II, B-Line, and especially the New English Quilter.  I found there is no such thing as an economical frame.  The price might be right, but shipping to Hawaii can cost nearly as much as the frame.

So my next thought was if I could find the plans or blueprints, my husband, handy guy that he is, needed a new project and could build one for me.  Easier said than done, however.  One comment I found on the internet that was so true was something like:  “A person could find instructions to build a bomb, but machine quilt frame plans are nearly impossible to find.”

After several months of searching and revising my “requirements,” I found plans that would serve my purpose and were reasonably priced.  I first found these plans on eBay and then went to his website.  After several days of contemplating, I bought the plans, printed them out, and handed them to my husband.  He was off to the hardware store like a shot.