Tuesday, December 9, 2008

Crocheted Beading

I purchased some #8 beads and, with my Mom's #10 crochet hook and #30 cotton crochet thread, got to work. Now, the struggle began. Trying to follow the instructions (like Karen, I hate to read them) and looking at the photos while manipulating these miserable little beads was probably one of the most frustrating things I’ve ever attempted. The first three rows are the most critical and if you can’t get them done, you’re sunk. The really hard part for me was trying to hold onto it and try to keep its shape as I crocheted the rows. I cannot begin to tell you how many times I tried to start the darn thing and ended up tearing it out until the thread was frayed and beads were flung across the room! Had a great time vacuuming that room, I can tell you. Here's my result with the #8 beads:


Compared to the bracelet that was given to me, this one was not very flexible and I thought it was too big. From several of the websites I looked at, they recommended starting with large beads and working down to the smaller beads.


After trying to start one at least 20 times, the frustration got the better of me and I found a website for Spiral Rope Starters. Some enterprising lady named Rose makes these little beginners and for $20, she’ll send you one. At least it gives you something to hold onto while starting these miserable things. However, while waiting for it to arrive, I tried using the Size 11 beads and it was a success! Dunno why the smaller beads were easier, but it worked and it only takes me 2-3 tries to get them started!

Here's several of my tries so far. I'm still having trouble perfecting the "invisible join" part. I can still see where it is, but am going to keep at it until I get it right.


I was complaining to my sister about not being able to find a good selection of beads here (not knowing that a new craft store had just opened across the street from my office!) and Debi was off like a shot to the craft store in Boise (me thinks she wants a bracelet…..). Anyway, I think a care package is in the mail, but knowing Debi, she probably has something up her sleeve.


Monday, December 8, 2008

New Projects

Bet you’ve been wondering what I’ve been up to lately. Well, I have another quilt pieced, but it is waiting for a border. I have the backing purchased, but it needs to be pieced. Then it goes on the new frame for quilting. So far, I’ve had lots of fun practicing on scrap fabric, but I think that putting a REAL quilt on this new frame just scares the bejeebers outa me. This quilt is meant for my newly-engaged niece and I don’t want to screw it up. I haven’t posted any photos of it because I don’t yet want Jaymi to see it.

So until then, I’ve been learning a new project. I admired a friend’s beaded bracelet quite awhile ago and she brought one back for me from the mainland as a thank you gift. (She bought herself an iPod Nano and does not have a computer from which to transfer her music. I wonder how she thought that was going to happen….so I put her music on my computer and did it for her. But that’s a whole nuther story.)

Anyway, looking closely at my new bracelet, I couldn’t figure out how it was made. So, to the internet I went. After much searching, I found sites for Crocheted Beaded Spiral bracelets or Endless Bead Crochet Ropes that looked like my bracelet.

Thursday, November 6, 2008

Devan's Scrappy Diamonds Is Finished

It's finally finished!

Although I was anxious to use my wonderful new frame, Devan's queen-size quilt was too big.  

Rather than trying to pin baste, I used "505" spray fabric adhesive.  It was fabulous and so easy to use.  This step was too hard on my old knees!


I put my walking foot on my sewing machine and the extenders in my dining room table.  I set up my machine and spent the next several evenings stitching in the ditch on the main body of the quilt.  (Karen, those goofy, knobby gloves are terrific!  Thank you!)  The edging was quilted in my first attempt at meandering.  That's not as easy as it looks, but I sure got lots of practice.


As you can see, Devan likes it!

Sunday, October 19, 2008

Improvements

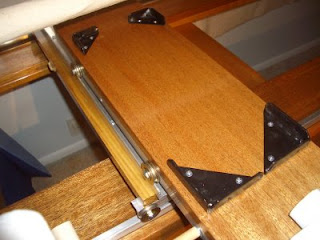
After playing" with the new quilt frame for a couple of weeks, Scott and I worked on some new changes/improvements. Although the original plans suggested using braces to hold the sewing machine in place, I was reluctant to use them because I didn't want them to scratch my sewing machine. However, as I was sewing at a pretty good speed, I found that the sewing machine was bouncing right off the carriage.

So Scott found these corner "thingees" and also found a liquid rubber coating. After dunking each piece and letting it dry for a few days, he installed them on the top carriage.


Same story with the handles which are made out of pvc pipe. I thought they were going to be too big. They aren't and they work great.


Using a couple pieces of doweling, Scott also fashioned a holder for the laser stylus for use while stitching pantographs. The first one we tried did not stay in place, especially when the machine was bouncing all over. This one is attached with a wood screw through a hole drilled through the aluminum tracking on the upper carriage. It's terrific.


I think my husband is breathing a sigh of relief. It's finally finished.