Sunday, October 19, 2008

Improvements

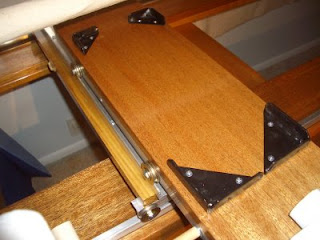
After playing" with the new quilt frame for a couple of weeks, Scott and I worked on some new changes/improvements. Although the original plans suggested using braces to hold the sewing machine in place, I was reluctant to use them because I didn't want them to scratch my sewing machine. However, as I was sewing at a pretty good speed, I found that the sewing machine was bouncing right off the carriage.

So Scott found these corner "thingees" and also found a liquid rubber coating. After dunking each piece and letting it dry for a few days, he installed them on the top carriage.


Same story with the handles which are made out of pvc pipe. I thought they were going to be too big. They aren't and they work great.


Using a couple pieces of doweling, Scott also fashioned a holder for the laser stylus for use while stitching pantographs. The first one we tried did not stay in place, especially when the machine was bouncing all over. This one is attached with a wood screw through a hole drilled through the aluminum tracking on the upper carriage. It's terrific.


I think my husband is breathing a sigh of relief. It's finally finished.


Monday, October 6, 2008

I'm Quilting!

My Aunt Karen asked me to take a video of the frame and how it works.  My problem was that I was using my camera in the left hand and operating the sewing machine in the right.  Then I completely forgot there was audio, too.  So much for patting my head and rubbing my tummy at the same time!  So take that into consideration with the following:


Since I filmed this little video, my husband installed handles on the back of the carriage which has made a big difference.  I'm also playing around with a laser stylus for the pantographs, but have not found a good solution for this yet.  This past week, I have been practicing, practicing, practicing!  I seem to be able to do the meandering thing okay, but pantographs are going to need a LOT more work!


Sunday, October 5, 2008

Quilt Frame 2

After reviewing the plans, we made several modifications.  Because of space constraints, we opted for an 8-foot table instead of 10- or 12-foot.  Scott also built the table out of mahogany which turned out beautifully.  


The other alteration I wanted was that the end supports be detachable so that the frame could be more easily dismantled for storage.  Instead of being permanently attached with wood screws, we changed it to carriage bolts and wing nuts.


The end result was better than I had ever hoped!  Now if I can learn to use it!


Quilt Frame

Ok, I had a great time learning to make the smaller lap quilts, but I want to make the bed-size quilts.  Hand stitching that size Hawaiian quilt can take up to two years, working on it full-time.  I don’t have that kind of patience or attention span.  The next step is to learn to machine quilt.

Devan’s Scrappy Diamonds quilt has created another problem.  My sewing table is only 2 feet by 4 feet.  The thought of wrestling with 3 layers on quilt on that small space was more than I could face.  So…to the internet. 

Cheapskate that I am, I looked for a portable machine quilt frame that was fairly economical.  Ones that I like were the Handiquilter II, B-Line, and especially the New English Quilter.  I found there is no such thing as an economical frame.  The price might be right, but shipping to Hawaii can cost nearly as much as the frame.

So my next thought was if I could find the plans or blueprints, my husband, handy guy that he is, needed a new project and could build one for me.  Easier said than done, however.  One comment I found on the internet that was so true was something like:  “A person could find instructions to build a bomb, but machine quilt frame plans are nearly impossible to find.”

After several months of searching and revising my “requirements,” I found plans that would serve my purpose and were reasonably priced.  I first found these plans on eBay and then went to his website.  After several days of contemplating, I bought the plans, printed them out, and handed them to my husband.  He was off to the hardware store like a shot.

Thursday, October 2, 2008

Devan's Scrappy Diamonds

My current project is a queen-size Scrappy Diamonds for my son, Devan. As you can tell, he likes lime green! His bedroom is even painted lime green! It took multiple trips to every fabric store on the island to come up with enough green material. I'm not sure about this one, probably too much green for me, but Devan loves it.

I got the top completed, purchased the batting, and found the backing material. Then I was faced with basting it with pins and no way did I have enough pins for this one! And I did not have enough table top space to try to machine quilt it. All of a sudden, I was overwhelmed and wondered how I was going to complete it. So it has gone into my closet as my second UFO until I can figure out what to do.

Sashiko


The third class I took was a Japanese Sashiko quilt. The class was taught by a little tiny lady named Lorraine, a retired school teacher. The quilt was 18 blocks each with a different Sashiko pattern and another 17 for every other block, all 8 1/2 inches square. All the blocks were backed by Thermor so the stitching was done through both the cotton top and the Thermor batting.

Lorraine would get each of us started on our blocks. She has lots of stories about her travels to Japan to learn more about Sashiko and the meanings behind the patterns. At the same time, she was feeding us home-made mango bread. Very good!

It took me about two weeks to get the blocks stitched and I had calluses on 2 fingers. I had to alternate fingers when one got sore. Because the blocks were not very big, I machine-quilted this one by stitching in the ditch on either side of the burgundy sashing strips. I am really happy how this quilt turned out, but I'm not sure if I want to do it again!


No Match Patch

My next class was the No Match Patch made out of 12 fat quarters.  It's a lap-size "sampler" with 12-inch blocks.  I had an awful time trying to choose fabric, never having done it before.  Carol at The Calico Cat kept telling me "not to worry -- just choose what you like."  Well, heck if I did that, it would all be the same color!   

Daphne, who taught the class, told us that we shouldn't be surprised if we ended up with blocks that had the same material next to each other.  I'm afraid that I got a little "mathematical" about it and proved her wrong.

This little quilt was quilted on the diagonal.  I used a striped fabric for the binding and it was cut on the bias so it was also diagonal.


After the trauma of trying to choose fabric for this quilt, I found a book, Color for the Terrified Quilter.  Must have had me in mind when they wrote it!


Wednesday, October 1, 2008

Kapakahi

After completing the table runner and the Spinning Puzzle, I wanted to take some beginning machine quilting classes which are a little hard to find on this island, especially for those of us who work full-time. Hawaiian quilting classes are much more available. A wonderful quilt store in Kaimuki, The Calico Cat, offers a variety of classes that are usually scheduled on Saturdays. I signed up for three classes (spread over several months).

The first one was the Kapakahi Quilt, a variation of the “Quilt as You Go” using scrap fabric. All three layers are quilted at the same time. Each finished block measures 9 ½ inches and blocks are sewn together with sashing strips. Although this was fun to do, as a beginner I had not yet built up a stash of scraps! Daphne, the instructor, shared some of hers with me and I now have 10 blocks completed. My first UFO (?)


Spinning Puzzle

For my birthday, my Aunt Karen sent me a kit she put together for the Spinning Puzzle. What fun this was! This project was also simply quilted by stitching in the ditch.

Spinning Puzzle

For my birthday, my Aunt Karen sent me a kit she put together for the Spinning Puzzle. What fun this was! This project was also simply quilted by stitching in the ditch.